Sunday, 31 January 2010

More wolf skins!


I painted the rest of the wolf skins last night whilst watching the second part of Silent Witness and the first two episodes Secret Diary of a Call Girl on my laptop (yes it really did take me that long). I think they look pretty good and I can't wait to get them finished and out of the way so I can go back to line infantry. I have a unit of wolf-skinned skirmishers yet to paint in a box at home which were meant to be in the 'starting line-up' of my army but a fear of the wolf skin put me off! Now I'm much more confident, I should be able to finish them pretty quickly and have a unit that looks great on the battlefield! It was inspired by this unit that Secundus created over at Iron Mitten. Those figures are from Renegade.


This is what I'm working on today. The three figures to the left make up the General's command stand - not sure what he's called yet though. I had a crisis of confidence over the naming of my characters last night so that's all changed! I wont post anymore photos of these guys until they're varnished and based so they really make an impact on the blog. Next along are the two leaders of my other two legionary units. And then the next two figures are the 4th figure that make up the front line of each Legionary cohort (4x4). I'm painting these are a test figure for the unit, shields and all. The un-armoured unit will have a mixture of coloured tunics and patterned shields to make them look much more like a hastily raised unit.

Hope you enjoy! I'm trying to get as much done on these today as possible but an afternoon in the pub watching the Arsenal game may stop my ambitions in their tracks.

Friday, 29 January 2010

Wolf skin take 2

I decided to add a few more lighter highlights to the edges of the wolf skin on the advice of others. I know the photo isn't the best and there are different light sources but you can just about make out the differences. It's a subtle improvement I think - makes it look realistic but I haven't over done it. I still don't know what it'll look like with the 'dip' applied so we'll have to see. Hopefully it'll look good as I'll be painting on the wolfskins of the 6 others I have to paint for the army this evening.

Wednesday, 27 January 2010

First attempt at wolf skin

I've always been too scared to paint wolf skins so my units have always been incomplete but not anymore! I've plucked up the courage to finally try one out for real! I decided to slightly differ from real life and just go for the black undercoat and light grey dry-brushing all over but I think it looks pretty good. I'm sure once the rest of the colours have been blocked in then it'll look fine (it's a bit dark at the minute!)


I thought it'd be better to dry-brush the skin first rather than paint the rest of the miniature so as to save having to go over each colour all over again. I'll just have to be really careful not to overlap onto the skin anywhere!


I might add some much lighter highlights on the edges of the fur later on and i'll paint the visible underside of the skin a sort of tan leather.

Comments and suggestions welcome!

Tuesday, 26 January 2010

My painting area

In response to several posts across the blogging world I've decided to post up a picture of my painting area at University. When I'm at home, I tend to paint whereever I find space. I usually end up on the dining room table making family members eat their tea amidst the legions of Rome and some paint.


This is where I paint at University. My paints are usually all over the table with notes scrawled on bits of paper, detailing the paints I need and what order I will paint them onto the miniatures. I got the lamp, laptop stand and keyboard for Christmas to help with my painting. The lamp will help me paint during the long, dark winter's nights. The stand helps keep my laptop out of the way and allows me to have reference pictures up on the screen at the same time as painting. I can also hide the keyboard away underneath the laptop to keep the space clear. The three figures waiting on the table will form the command stand of the army once painted and based. I'm currently painting all the command figures first, then moving onto the monotony of the line troops!


This pic shows my Foundry and Vallejo paints (I have some more of these in the drawer but don't use them so often), brushes, tin of Army Painter, water pot and penknife I use for removing flashing and opening the tin lid! - all stored in some of the packaging sent with Foundry figures.

I hope this provides an interesting insight into my painting area. With my laptop infront of me, I can also watch DVDs, iPlayer and all sorts to keep me entertained. I've tried to hide my hobby from my flatmates but there's no getting away from it now and they think it's kind of cool anyway!

Sunday, 24 January 2010

Governor 'George C. Scott' Barbula


This is the figure representing Governor Barbula which I've been working on recently. He's been dipped, varnished and based making him my first completely finished miniature! The detail on his face is incredible giving a very realistic look and feel. It really ranks up there with some of the better miniatures painted using the shading technique (I've used the Army Painter for this one). This is also my first attempt at a horse - it looks rather demonic - but it hasn't turned out too bad! I really like the base which looks very realistic. The sand at the front of the base looks like little stones but they are in fact grains of sand, painted brown then dry brushed with 3 shades of sand. The grass tufts are from Silfor. Let me know what you think and any questions will be answered asap (the picture is clickable too!).

I'm now back at University and I've taken my first 1000pt Roman army with me to paint up. There'll be more posts over the next few weeks showing the progression of the Romans and a few Greeks i'm working on and hopefully a few posts relating to the campaign too. Keep checking back for regular updates or 'follow' the blog!

Friday, 22 January 2010

The Army of Syria

I've just made an order for the bulk of Governor Barbula's Syrian army. This will oppose my main force on the battlefield and should make for an interesting battle as 50% of its points are spent on horse archers. Anyway, here is the WAB list, costing up each unit that makes up the army.

Army of Syria - 1016 pts

Senior Officer - 110pts
20 Horse archers @ 24pts each (480pts)
24 Legionaries of the III Gallica @ 16pts each (394pts) +10 for Centurion
8 Slingers @ 4pts each (32pts)

Obviously this is just the beginning of something bigger but will certainly give me a good range of figures which could be used in other armies. I watched a documentary on Alexander the Great this morning and this reignited my interest in my Macedonian army which is all boxed up somewhere. Some of the troops from this Army of Syria could be used in his army or against him, fighting for the Persians. But of course that will have to wait, probably until next year!

Thursday, 21 January 2010

Making room.

With my growing collection of miniatures and modelling equipment I thought it time to get rid of some of my old Warhammer figures, which currently use up 6 drawers in a small chest of drawers, and make some room. Whilst rummaging around in the piles of poorly painted miniatures I found a few gems which I painted at the then peak of my painting ability some 6 years ago when I was about 14 (after that, I gave up Warhammer and concentrated on being 'cool'). The following pictures are representative of my work at the end of my Warhammer career and I thought you'd like to see when I considered 'good' all those years ago (it hasn't improved much since then!)


This was my favourite painted model at the time. I think it's from the Wood Elves range and I was given it in a carrier bag full of all sorts of old GW figures (including a complete blood bowl team!) by a family friend who'd found it in a charity shop. I had spent a lot of time put a lot of work into this figure and was using something similar to today's 3 shade method (dip wasn't invented) which achieved pretty decent results. He was used quite a lot as an Ent in LOTR games.


I think this is Samwise Gamgee from the Weathertop boxed set GW do. I used to spray ALL my figures black and then leave 'shading gaps' to simulate shading. For some reason, the paint was always rather sticky which meant you could do this really easily - it was a lot like drybrushing actually but I have no idea why my paints all went like that. I also used to paint the faces dark brown and then paint fleshy highlights, as you can see in the pic. We played a lot of LOTR games as it was the only range we had complete sets of figures for (because they were small scale skirmish games).


I don't know if any of you remember 'City Fight' by GW but me and my friends all built armies for it. I had built a sort of rag tag band of hardy Imperial Guard which included Cadian, Valhallan and those ones that were supposed to look a bit like the Nazis (Steel Legion or something like that?) which always seemed to be the ones who would fight to the death to defend my team mates' retreat as I was set upon by hordes of Tyranids or Orcs. The rest of the 'army' was of a similar standard - I was quite proud of the camouflage at the time!

So there you go, a little look back at my career as a painter. Of all the GW things I've got, the only one I'd seriously consider revisiting would be the LOTR skirmish games (not the War of the Ring) as they were always very fun and action packed. My friend who lived behind my house used to come round every weekend for a game of something (he used to climb through a hole in our hedge!). Playstation 2s were invented a little later on and so our lives ended...


Tuesday, 19 January 2010

Progress Report (4)


I've been working on another unit of 12 foot - this time Spanish Scutari, making the most of the light we had up North today. The shot above shows a photo of the first 6. They have been dipped AND matte varnished (my first unit to receive the complete treatment) and they look great. The varnish makes them look almost cartoon-like but they look a lot better now than they did before.


This is a close-up of one of the figures after the varnish had been applied. Not shiny at all!

I had originally intended these Spanish troops to form part of the auxiliary section of my core 1000pt Roman army but I changed my mind, opting instead for some raw recruits. These Spanish troops (available from 1st Corps) offer great flexibility and could be used with most armies across the Mediterranean as an infantry option. I had intended to base them individually using GW style bases but have instead decided to base them on 60mm square bases - 6 to a base.


Today's attempt (left) with an earlier attempt at basing (right).

I also had another go at basing, this time with much greater success! The stones on today's attempt look almost real. This is only my second attempt at 'dry-brushing' and I think it went quite well. I wrote a post about my first attempt with you can read here.

All photos are clickable. Feel free to leave thoughts and suggestions.

Sunday, 3 January 2010

Progress Report (3)

I thought I'd give you a little look at the army in its entirety. The units represent 998 points in WAB terms and as you will see, only one unit is nearing completion! Each photo is clickable and annotated underneath. Comments and feedback welcome!


This is the unit led by the Tribune Gaius Sempronius. The legionaries are finished but just need their bases sorting out and their wolf skin-clad standard and musician painting. The figure on the left of the front row gives an example of what a completed miniature would look like (not all will have tufts on their bases).


These are the two command stands but only one will be used for this Vexillation (1000pt army). They need individually mounting, ready for painting.


This is my second cohort, led by Centurion Spurius Maximus and that pile in front of them are their shields.


This is the third cohort which represents a newly raised, un-armoured unit led by ex-gladiator trainer Lucius Murena (he's a bit of a brute).


This is my unit of horse led by L. Aemilius Paullus. They aren't glued to the horses yet and will only be properly mounted once both horse and rider are painted (I've found a fellow blogger who has kindly offered to paint the horses for me! Hurrah!)

The army looks quite impressive in my not-so-impressive display cabinet (i'll post a picture of it in another post) and I'm looking forward to seeing it complete and on the table although I have another distraction to fight!

In December's issue of Wargames Illustrated I read an article on the American War of Independence and my Dad and myself decided to buy some Perry Continental infantry and militia as a start with a view to building both a British and an American army. This will be a slowly progressing, long-term project which will only be added to once current figures are painted! Below are some progress shots. Please note, they are only WIPs and I tend to just hastily block in the colour, not worrying about overlap of colours as I go back later and ensure perfect colour joins before using the AP. I will be trying a new technique following Saxon Dog's blog which is where you highlight you miniature AFTER applying the AP which is supposed to make them look even better, especially is the miniature has lots of whites.


One of Perry Miniature's Militia command packs.


Still plenty to do on this one!

Saturday, 2 January 2010

Not so much a resolution...

...as a list of aims and objectives for the new year.

My blog hasn't been running long enough for me to have any resolutions from last year to compare with but I want to make some for this year, as it will interesting to see what I can achieve in a year and hopefully a written list will help motivate me to get it done! So here we go, my aims and objectives for the next year (well, more a list of things to do):

1. Finish a Roman army of 1000pts for WAB (hopefully by March)
2. Finish Governor Barbula's revolt army (1000pts)
3. Settle on a rule system for AWI (I'm currently looking at British Grenadier)
4. Purchase an American army
5. Paint an American army
6. Purchase a British army - £128 from Wargames Foundry using their 20% discount offer
7. Paint a British army

I have a Greek/Macedonian army to paint at some stage but some units may be painted up as part of Barbula's army (utility troops such as archers, skirmishers, etc). I also have some VBCW and WWII figures but I'm not sure where they'll fit in at the moment.

Now i've committed myself, I feel very under-pressure to get all this done!

NOTE: I have tagged this post with a label so you will be able to click on that tag to view current progress on my projects.

Friday, 1 January 2010

Painting Celts with Army Painter (Guide)

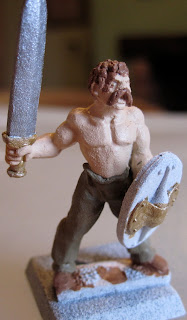
As I'm sure you're aware, I use the Army Painter dipping method to paint all of my troops. I've had a go at painting a Celt using this method to see how it fairs on a mostly flesh figure. The following is a methodological sequence from start to finish showing each stage in clickable picture form.


First, I sprayed the miniature with a white primer available from Warlord Games. Once dry, I blocked in the flesh colour.


After that, I blocked in the gold (bronze) on the shield and the sword handle.


I then used a colour from my WWII collection (German Camo Beige) to paint his trousers.


I then painted his hair and shoes. Note: not taking care on the hair! But I would go back later and touch up the flesh.


I then painted in the shield colours.


This photo shows a comparison of the miniature before he was painted with the dip and afterwards. As you can see, it's superbly shaded the areas you would want it to. The photo on the right was taken immediately after he was painted with dip and as a result, looks 'wet'.


This picture is a comparison before and after, this time showing the rear of the miniature. As you can see, it's done a great job!

I stand by Army Painter or the 'dip' method as a great way of getting better looking miniatures without having to be as good a painter (which I am not). If AP wasn't invented, I probably would have just left the figure how it is in the left of the comparison shots. I actually think the AP can make figures look more realistic than using the traditional shading method. Please note that this miniature still needs to be matte varnished to remove the shine.

It must have taken me about 20 minutes to paint this miniature (very brief drying time included in that!) and I could easily paint a warband within an evening or two using the method!